

The All Flat Raft Frame - part 2 of 2
/

We believe part of working on a new design for a raft frame is seeing what works, what needs adjustments, and then making things better.
After a summer of trips on the water with our most current demo raft, a few things have been finished, revised, and learned along the way.
Paint
We had some 2 part epoxy paint at the shop and decided to use it as a surface treatment for the bare aluminum.
It took about one full day to paint the frame, boxes, sleep plates, and table. So, when comparing the cost of doing it yourself to taking it to a powder coater, it ends up being a bit of a wash. That decision will come down to what you value your time at and if you have the tools and space to do this type of work.
The color is a shade of turquoise named Aruba Blue. And, we get it, it may not be for everyone. That said, it’s a color that taught us something. It was noticeably hotter than the white we’ve used on some of our past demo rafts. It’s surprising how much more heat gain from the sun results from what you think is a light color. Grays and lighter shades of the various color spectrums seem to run hotter than just plain white.
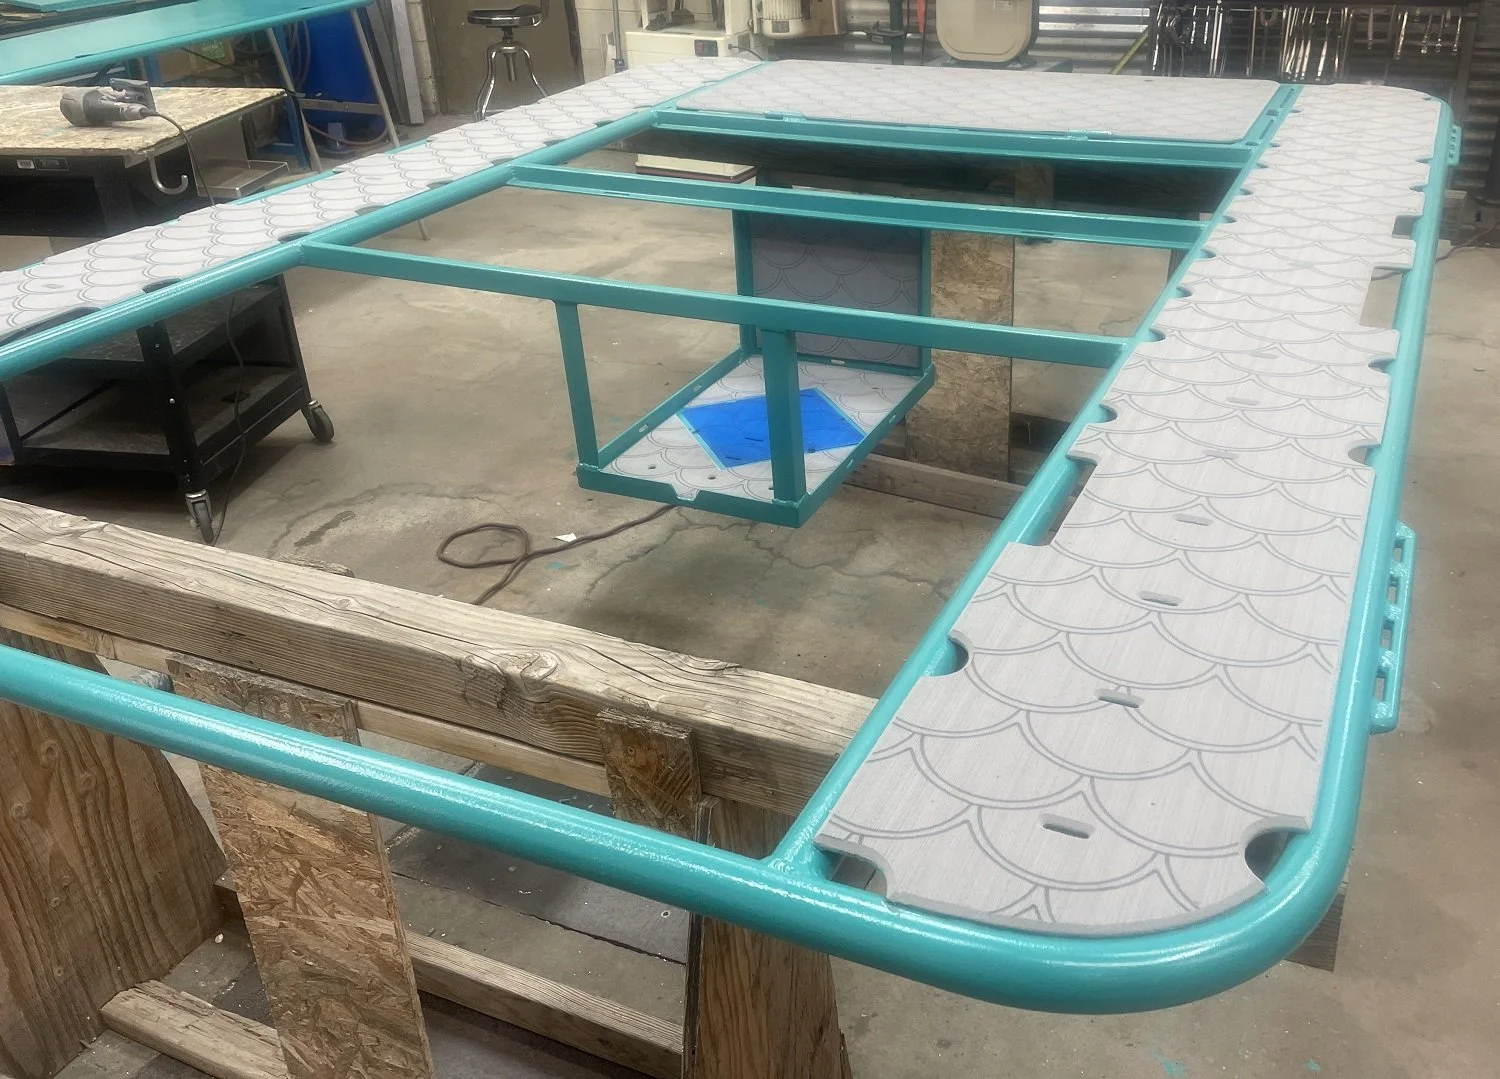

SeaDek
It’s easy for a shop like ours to put SeaDek on every surface of our frames but, if you are on a budget, it’s worthwhile to take time think about what parts of your raft set up you’ll be sitting &/or walking on. Think about what may be covered by paco pads or other things that wouldn’t make it necessary to put a traction/protective foam on. And, don’t forget about the surfaces you’ll be steeping on when loading and unloading. You don’t want to ruin your trip with a slip, while carrying an awkward item to where it gets rigged.
Push button latches
Push button latches are sleek flushed mounted latches that can be very usable but, they do come with downsides. For some reason the latches we installed on the boxes for this raft were being extra temperamental. It was taking several tries to get some of the latches to click all the way shut. Bummer!
Well, like most things, a little sleuthing yielded a lot of info. Turns out there was a lesson to be learned about this style of latch.
Push button latches tend to leak if they aren’t set right, and we’ve had the occasional leak in the past. In an attempt to not have that be an issue with this set, we made the bolt holding the mounting bracket extra tight. Turns out extra tight was too tight because it slightly deformed the latch housing and made it so the little catch on the latch couldn’t fully seat. Bummer again.


When you’re trying to get one of these touchy latches to catch, you can bend back the wing, which causes it to not sit as flush as it needs to for it to catch. Unfortunately for us, in this case, the “bang on it until it works better” approach didn’t work. In the end we loosened the torque on the mounting bolt, which worked for most of the latches. We’re also looking into getting push button latches with a gasket, which we’re hoping will also help with the issue.
Design Layout
When doing the layout for this new style of cross bars and flush set up, we could have spent a little more time considering all the various items that needed to play nice together on the new frame.
While not everyone likes laying sleeping pads out for passengers to sit on, for this design we used a 28” wide pad to cover the frontmost hatch and a 24” wide one to cover the bay in front of the rower, with the split boxes. After everything was put together and the sleeping pads were rigged in, they ended up interfering with opening the side boxes in the rowers footwell. If we only had an inch!


We tried not putting a pad over the bay in front of the rower but that just didn’t feel right. So, until we buy a skinnier pad, you need to push the pad back out of the way when you get in and out of the side boxes. Good thing you can only complain about so much when you’re on a raft trip : )
Yet another reminder of the importance of taking time to plan your design layout all the way through.
Self-Bailing Floor
This was the first demo raft package we’ve built using an Avon. The old super pro design is great. So great that Hyside is remaking it. It feels like a 16’ with the room of an 18’ gear hauler.
It also has a floor that surprised us with how much it travels and rises when on the water. Even after giving the boxes and the rigid floor on the frame 2-3” of clearance, the raft’s floor still hit them. It was a good reminder that raft floors have a slight skyward arching that you need to account for when you design your frame.
Final Thoughts
All in all, we think many of the ideas we tried with this design turned out great and, having the “all flat” part of the frame the size of a queen size bed, really increased the comfort for everyone.
There you go. We hope this helps you think about your future projects.
-
September 2022
- Sep 16, 2022 The All Flat Raft Frame - part 2 of 2 Sep 16, 2022
-
July 2022
- Jul 14, 2022 The All Flat Raft Frame - part 1 of 2 Jul 14, 2022
-
May 2022
- May 12, 2022 Cooler Latch Surgery May 12, 2022
-
April 2021
- Apr 4, 2021 Comparing 12’ Rafts - Hyside Max 12 v NRS 12’ Osprey Apr 4, 2021
-
January 2021
- Jan 19, 2021 Designing for Cooler Latch Clearances Jan 19, 2021
-
November 2020
- Nov 4, 2020 Trying out a few new ideas on our 2020 NRS E-160 demo raft. Nov 4, 2020
-
April 2020
- Apr 21, 2020 Oar Tower Placement & The 4-bay Raft Frame Design Challenge Apr 21, 2020
-
October 2019
- Oct 31, 2019 Adding Side Decks with SeaDek to a Single Rail Frame Oct 31, 2019
-
August 2019
- Aug 23, 2019 Oar Tower Testing: Speed-Rail fitting with stanchion vs NRS frame oar mount Aug 23, 2019
- Aug 12, 2019 Can you put SeaDek foam on Diamond Plate Decks? Aug 12, 2019
-
May 2019
- May 17, 2019 Choosing & Setting Up a Raft Bimini May 17, 2019
-
March 2019
- Mar 28, 2019 Finishing details of the first CHUB Mar 28, 2019
- Mar 15, 2019 Comparing 16' Rafts - NRS E-160 v Hyside PRO 16 XT Mar 15, 2019
-
November 2018
- Nov 6, 2018 Our Aluminum "Chub" Hatchery. Nov 6, 2018
-
August 2018
- Aug 11, 2018 New Raft - New Ideas Aug 11, 2018
- Aug 2, 2018 Testing out using foam for the side decking on a raft frame Aug 2, 2018
-
June 2018
- Jun 30, 2018 Rigging Rails for Raft Frames Jun 30, 2018
-
May 2018
- May 29, 2018 Hog Island - One River Many Voices Project May 29, 2018
-
March 2018
- Mar 22, 2018 Dry Box Tray Mar 22, 2018
- Mar 8, 2018 A visit from the Wooden Brother Mar 8, 2018
-
February 2018
- Feb 16, 2018 The Details in the Dories Feb 16, 2018
- Feb 7, 2018 Dory Build - the "Dimock" Evolved Briggs Boats Feb 7, 2018